Vue3 + webpack 多入口
写在最前面:切换npm源。
- 查看npm源地址(默认为: https://registry.npmjs.org)
-
npm config get registry - 修改源地址
-
#	registry.npm.taobao.org 的 HTTPS 证书到期
npm config set registry https://registry.npm.taobao.org

#	2024-02-22 更新
#	请使用最新(下方)的 npmjs.com 镜像,官网:https://npmmirror.com/
npm config set registry https://registry.npmmirror.com
这里简单的记录一下:Vue3 + webpack下的多入口demo。该demo并没有使用
最简:跑起来就行 代码下载
这是第一步,仅仅是Vue3 + webpack的组合,只是弄了个多入口。没有使用单文件组件、
目录树
先看一下demo目录结构,编译前后做个对比:
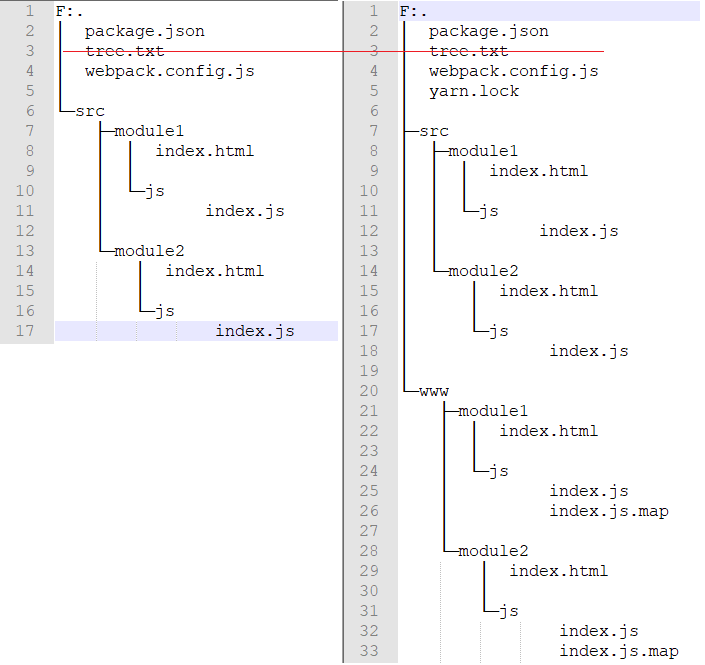
上面的对比图,你可以忽略tree.txt文件。你可以使用下面的命令生成目录结构文件:
tree /f >tree.txt
html和对应的js
开篇说了处理多个入口页面,所以这里创建了两个文件夹(module1和module2)来模拟没有任何关系的两个子模块。这两个模块的代码没有什么大的不同,只是1和2的区别。
模块1的路径:
模块2的路径:
import * as Vue from "vue";
Vue.createApp({
    data() {
        return {
            msg: "Hi,这里是 Vue3 + webpack 多入口 示例项目 模块1 入口页面"
        }
    }
}).mount('#vue3Module1Entry');
package.json
{
    "name": "vue3-webpack-multi-entry-demo",
    "version": "1.0.0",
    "main": "index.js",
    "license": "MIT",
    "scripts": {
        "start": "webpack --progress --watch"
    }
}
#   你可以用下面的命令安装
yarn add vue@next
yarn add html-webpack-plugin webpack webpack-cli -D
webpack.config.js
// yarn add vue@next
// yarn add html-webpack-plugin webpack webpack-cli -D

const path = require('path');
const webpack = require('webpack');
const HtmlWebPack = require('html-webpack-plugin');

let multiPageConfig = [{
    entry: {
        sourcePath: "./src/module1/js/index.js",
        // entry.key中以'/'分割,最后一项是文件的名称,前面的都是目录
        targetPath: "module1/js/index"
    },
    htmlWebPack: {
        sourcePath: './src/module1/index.html',
        targetPath: 'module1/index.html'
    }
}, {
    entry: {
        sourcePath: "./src/module2/js/index.js",
        targetPath: "module2/js/index"
    },
    htmlWebPack: {
        sourcePath: './src/module2/index.html',
        targetPath: 'module2/index.html'
    }
}];

let tempModuleExportsObj = {
    mode: 'development', // production | development
    devtool: "source-map",
    entry: {},
    output: {
        filename: '[name].js',
        path: path.resolve(__dirname, './www'),
        //publicPath: '/'
        //  为了可以在github上可以浏览,这里做下面的修改
        publicPath: '/vue3/www/'
    },
    module: {
        rules: []
    },
    resolve: {
        alias: {
            //  [Vue warn]: Component provided template option but runtime compilation is not supported in this build of Vue. Configure your bundler to alias "vue" to "vue/dist/vue.esm-bundler.js".
            'vue': 'vue/dist/vue.esm-bundler.js'
        }
    },
    plugins: [
        //  Feature flags __VUE_OPTIONS_API__, __VUE_PROD_DEVTOOLS__ are not explicitly defined. You are running the esm-bundler build of Vue, which expects these compile-time feature flags to be globally injected via the bundler config in order to get better tree-shaking in the production bundle.
        new webpack.DefinePlugin({
            __VUE_OPTIONS_API__: true,
            __VUE_PROD_DEVTOOLS__: false,
        })
    ]
};
multiPageConfig.forEach(singlePage => {
    let tempEntryObj = {};
    tempEntryObj[singlePage.entry.targetPath] = singlePage.entry.sourcePath;
    Object.assign(tempModuleExportsObj.entry, tempEntryObj);
    let tempHtmlWebPackOption = {
        inject: true,
        hash: true, //开启hash  ?[hash]
        chunks: [singlePage.entry.targetPath], //页面要引入的包
    };
    Object.assign(tempHtmlWebPackOption, {
        template: singlePage.htmlWebPack.sourcePath,
        filename: singlePage.htmlWebPack.targetPath
    });
    tempModuleExportsObj.plugins.push(new HtmlWebPack(tempHtmlWebPackOption));
});
module.exports = tempModuleExportsObj;
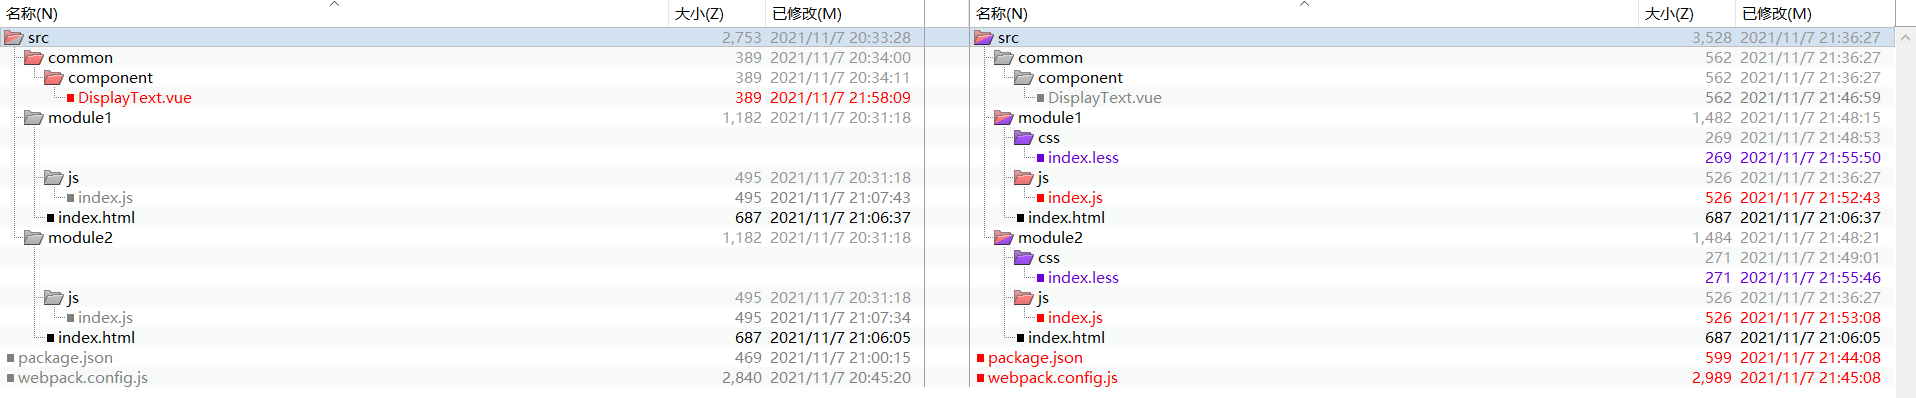
添加单文件组件支持 代码下载
先来张图看看结构的变化

新增单文件组件
既然是单文件组件,先来一个,尽量简单(路径为:/src/common/component/DisplayText.vue):就是展示一些文本。下面是组件代码:
{{value}}
两个html页面更新
两个html页面都添加下面的内容
两个html页面对应的js更新
对应的js文件用下面的替换(记得改一下两个页面的区别)
import * as Vue from "vue";
import DisplayText from '../../common/component/DisplayText.vue';
Vue.createApp({
    data() {
        return {
            msg: "Hi,这里是 Vue3 + webpack 多入口 示例项目 模块1 入口页面",
            displayText: "再说一遍,这里是 模块1 入口页面",
            displayTextStyle: {
                fontWeight: "bold"
            }
        }
    },
    components: {
        DisplayText
    }
}).mount('#vue3Module1Entry');
package.json更新
新增
#   你可以用下面的命令安装
yarn add vue@next
yarn add @vue/compiler-sfc html-webpack-plugin vue-loader@next webpack webpack-cli -D
webpack.config.js更新
引入
// 第二版:添加的内容
const {
    VueLoaderPlugin
} = require('vue-loader');

let tempModuleExportsObj = {
    module: {
        rules: [
            // 第二版:添加的内容
            {
                test: /\.vue$/,
                use: ['vue-loader']
            }
        ]
    },
    plugins: [
        // 第二版:添加的内容
        new VueLoaderPlugin()
    ]
};

LESS支持 代码下载
还是先来张图看看结构的变化
单文件组件添加LESS
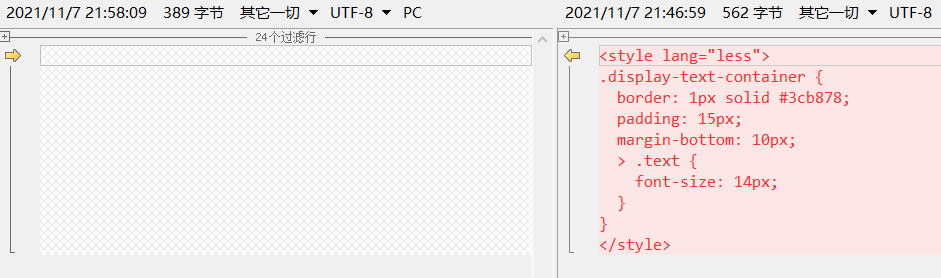
新增LESS文件
两个模块都添加
//  两个LESS文件公共部分
*,
*::before,
*::after {
    box-sizing: border-box;
}

html,
body {
    height: 100%;
    width: 100%;
    margin: 0;
}
//  模块1 入口页面 样式文件
#vue3Module1Entry {
    height: 100%;
    width: 100%;
    padding: 20px;
    overflow: hidden;
    color: chocolate;
}
//  模块2 入口页面 样式文件
#vue3Module2Entry {
    height: 100%;
    width: 100%;
    padding: 10px;
    overflow: hidden;
    color: blue;
}
引入LESS文件
两个入口页面对应的JS文件引入LESS(这里放在了JS文件的最上方)
//  两个入口页面对应的JS文件新增引入样式
import '../css/index.less';
package.json更新
新增
#   你可以用下面的命令安装
yarn add vue@next
yarn add @vue/compiler-sfc css-loader html-webpack-plugin less less-loader style-loader vue-loader@next webpack webpack-cli -D
webpack.config.js更新
rules中添加LESS文件处理
let tempModuleExportsObj = {
    module: {
        rules: [
            // 第三版:添加的内容
            {
                test: /\.less$/,
                use: ['style-loader', 'css-loader', 'less-loader']
            }
        ]
    }
};

静态文件-图片 代码下载
还是先来张图看看结构的变化
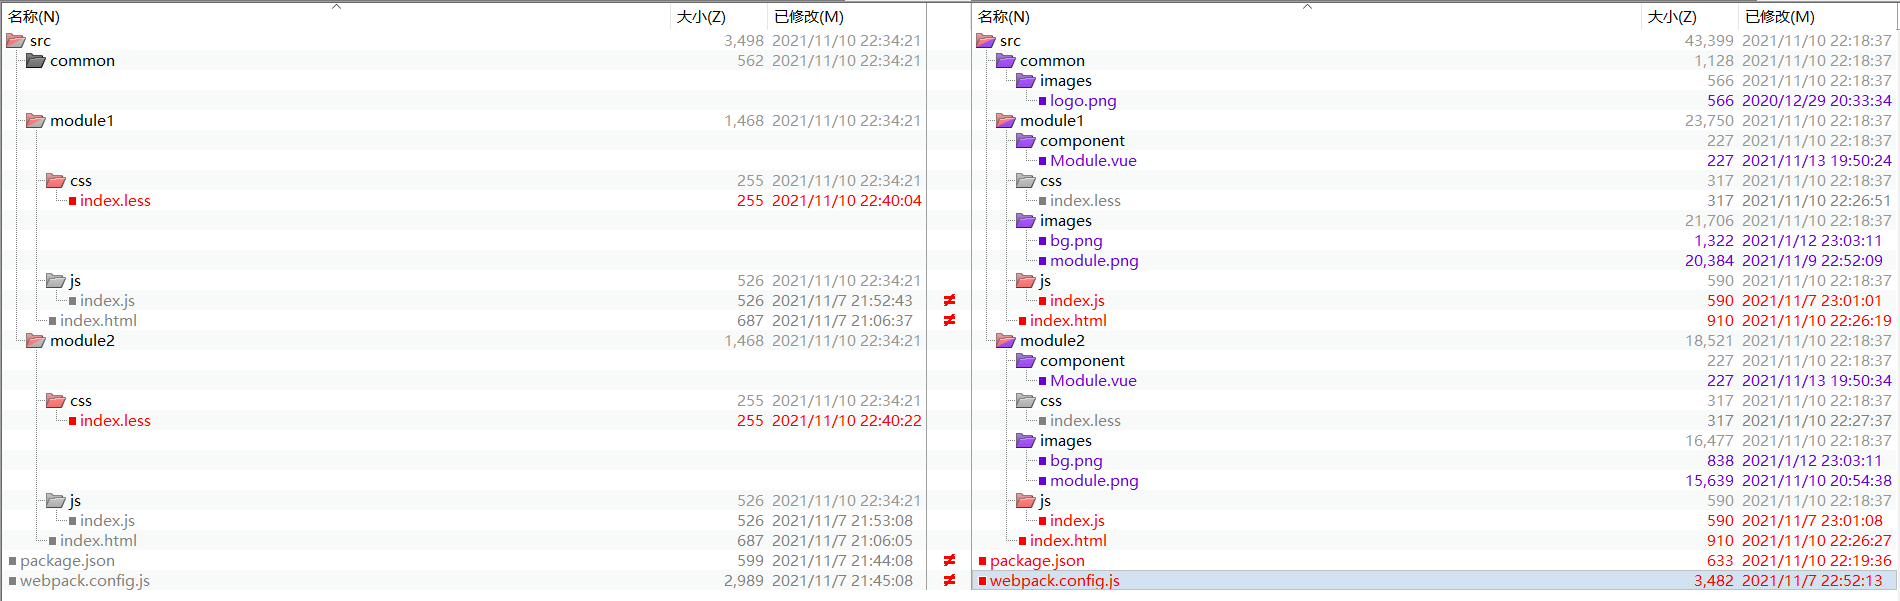
1、公共文件夹
2、两个模块下各添加两张图片:一张作为
3、两个模块下都创建一个特有单文件组件(路径为:/src/module1/component/Module.vue),这两个组件的代码相同,该组件展示一张特有的图片;
单文件组件:这里展示一张图片

4、两个入口文件对应的LESS文件以
//  新增加的内容
body {
    background: url(../images/bg.png) repeat-x;
}
此次添加的图片你可以在这里找到: 快去找图片吧
两个html页面更新
两个html页面对应的js更新
//  引入组件
import Module from '../component/Module.vue';
//  注册组件
components: {
    Module
}
package.json更新
新增
yarn add vue@next
yarn add @vue/compiler-sfc css-loader html-loader html-webpack-plugin less less-loader style-loader vue-loader@next webpack webpack-cli -D
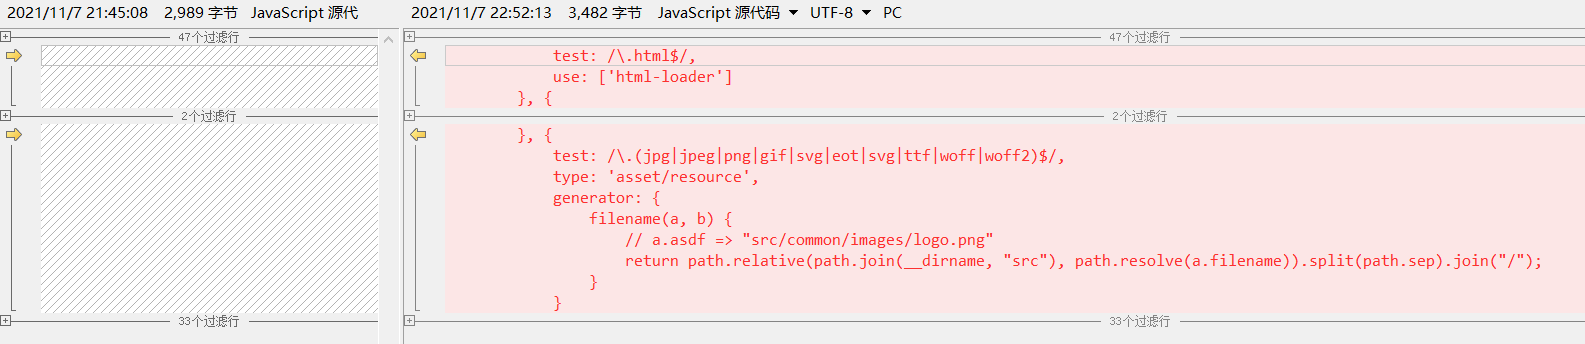
webpack.config.js更新
rules中添加HTML文件处理以及静态文件(这里是图片)处理
let tempModuleExportsObj = {
    module: {
        rules: [
            // 第四版:添加的内容
            {
                test: /\.html$/,
                use: ['html-loader']
            },
            {
                test: /\.(jpg|jpeg|png|gif|svg|eot|svg|ttf|woff|woff2)$/,
                type: 'asset/resource',
                generator: {
                    filename(a, b) {
                        // a.asdf => "src/common/images/logo.png"
                        return path.relative(path.join(__dirname, "src"), path.resolve(a.filename)).split(path.sep).join("/");
                    }
                }
            }
        ]
    }
};
记得上次写的时候是通过
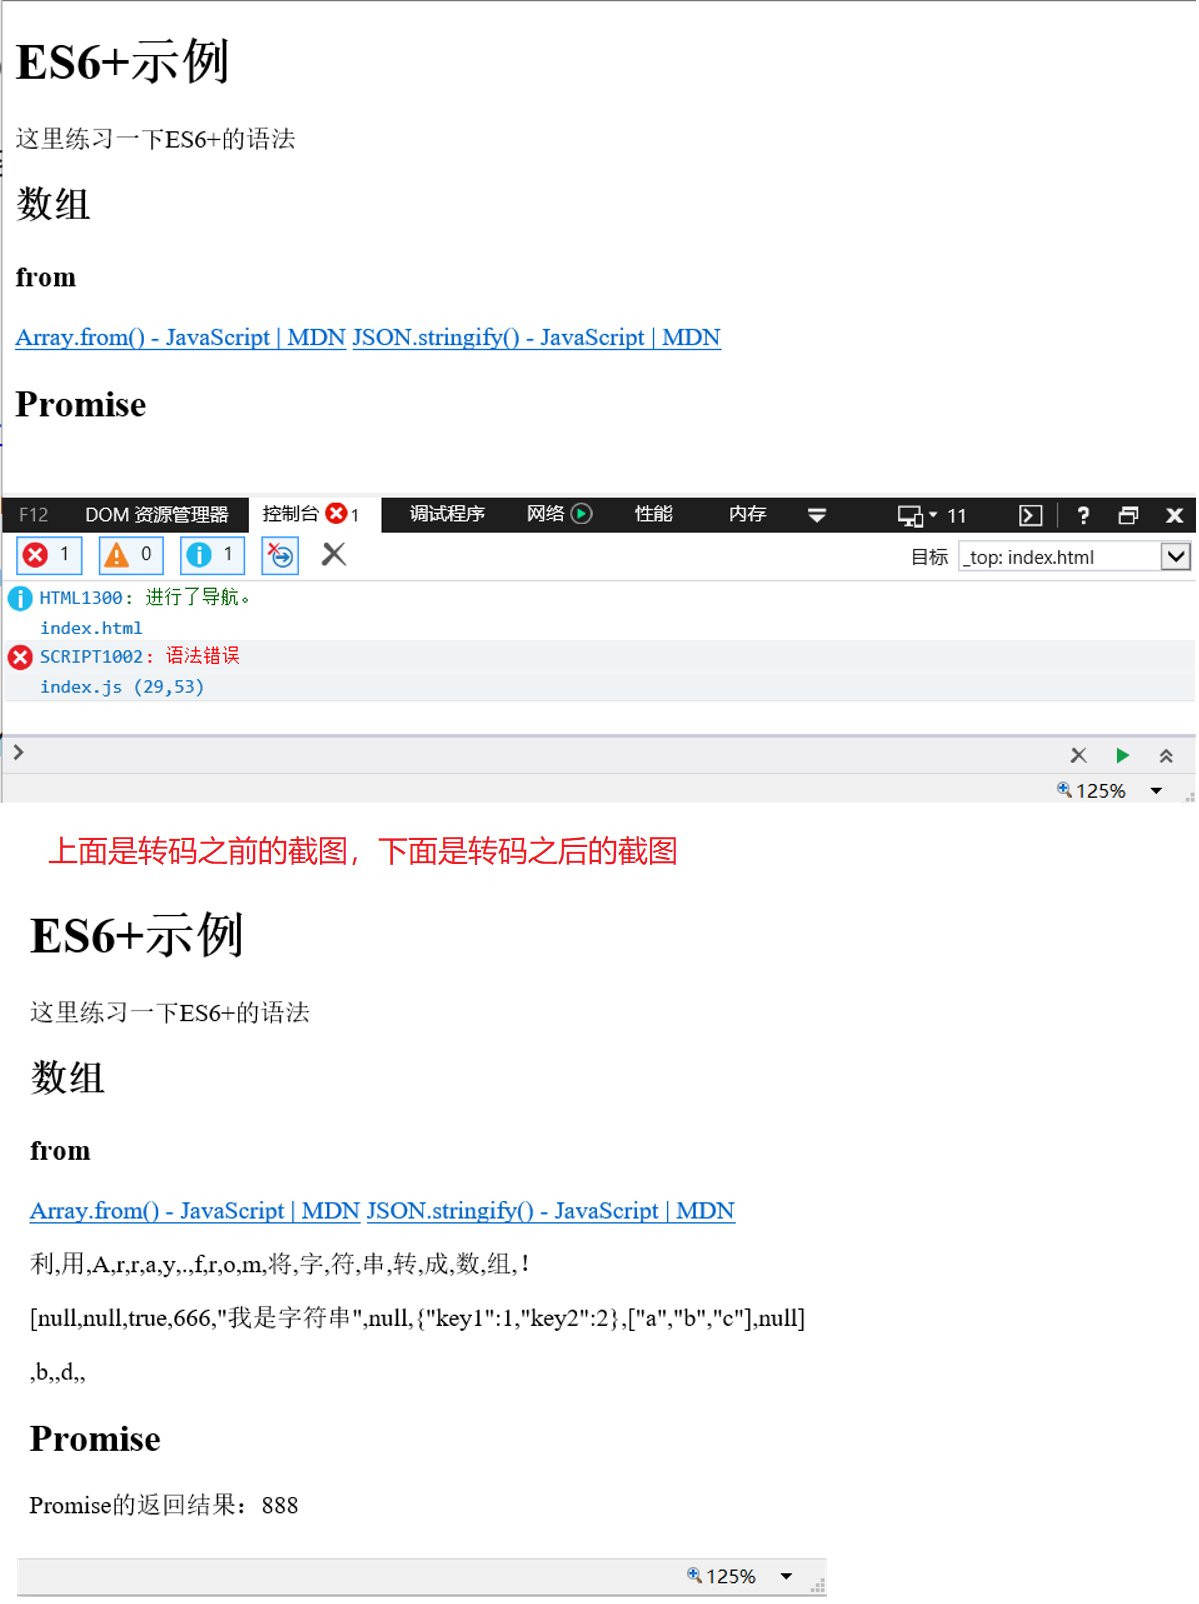
JS转ES5代码下载
转ES5在实际项目中用的太多了,之前在vue2.x的时候也弄了,但是此时按照原来的方式就行不通了,出现了一些问题,最后发现竟然是

原来的vue相关的代码没有变动,只是增加了一个新的模块(module3)来测试ES5的转换(路径为:/src/module3/index.html 和 /src/module3/js/index.js)。
新增的html页面
新增的js
document.addEventListener("DOMContentLoaded", function () {
    document.getElementById("array-from-1").innerHTML = Array.from("利用Array.from将字符串转成数组!");
    document.getElementById("array-from-2").innerHTML = JSON.stringify(Array.from({
        0: null,
        1: undefined,
        2: true,
        3: 666,
        4: "我是字符串",
        5: Symbol("key1"),
        6: {
            key1: 1,
            key2: 2
        },
        7: ["a", "b", "c"],
        8: function () {},
        length: 9,
    }));
    document.getElementById("array-from-3").innerHTML = Array.from({
        1: "b",
        3: "d",
        length: 6
    });

    Promise.resolve("Promise的返回结果:888").then((ret) => {
        document.getElementById("promise-1").innerHTML = ret;
    });
});
package.json更新
在处理ES6+转ES5的时候,当时就查到了两种处理方式,添加的依赖项不同,这里都记录一下:
# 这里是没有转码的命令(也就是上一版本的),你可以先试试他,之后再试试下面的两种方式,做一下对比
yarn add vue@next
yarn add @vue/compiler-sfc css-loader html-loader html-webpack-plugin less less-loader style-loader vue-loader@next webpack webpack-cli -D
# 你可以用下面的命令安装
yarn add vue@next
# 方式一添加的依赖:@babel/core @babel/preset-env babel-loader core-js regenerator-runtime
yarn add @babel/core @babel/preset-env @vue/compiler-sfc babel-loader core-js css-loader html-loader html-webpack-plugin less less-loader regenerator-runtime style-loader vue-loader@next webpack webpack-cli -D
# 你可以用下面的命令安装
yarn add vue@next
# 方式二添加的依赖:@babel/core @babel/plugin-transform-runtime @babel/preset-env @babel/runtime @babel/runtime-corejs3 babel-loader
yarn add @babel/core @babel/plugin-transform-runtime @babel/preset-env @babel/runtime @babel/runtime-corejs3 @vue/compiler-sfc babel-loader css-loader html-loader html-webpack-plugin less less-loader style-loader vue-loader@next webpack webpack-cli -D
webpack.config.js更新
// yarn add vue@next
//      ES6+转ES5,第一种实现方式新增的依赖:@babel/core @babel/preset-env babel-loader core-js regenerator-runtime
// yarn add @babel/core @babel/preset-env @vue/compiler-sfc babel-loader core-js css-loader html-loader html-webpack-plugin less less-loader regenerator-runtime style-loader vue-loader@next webpack webpack-cli -D
//      ES6+转ES5,第二种实现方式新增的依赖:@babel/core @babel/plugin-transform-runtime @babel/preset-env @babel/runtime @babel/runtime-corejs3 babel-loader
// yarn add @babel/core @babel/plugin-transform-runtime @babel/preset-env @babel/runtime @babel/runtime-corejs3 @vue/compiler-sfc babel-loader css-loader html-loader html-webpack-plugin less less-loader style-loader vue-loader@next webpack webpack-cli -D

let multiPageConfig = [
    // 第五版:添加的内容
    {
        entry: {
            sourcePath: "./src/module3/js/index.js",
            targetPath: "module3/js/index"
        },
        htmlWebPack: {
            sourcePath: './src/module3/index.html',
            targetPath: 'module3/index.html'
        }
    }
];
let tempModuleExportsObj = {
    // 第五版:添加的内容
    target: ['web', 'es5'],
    module: {
        rules: [
            // 第五版:添加html-loader配置项和添加babel-loader
            {
                test: /\.html$/,
                loader: 'html-loader',
                options: {
                    sources: {
                        // // 第一版使用的方式,但是不太好,不能过滤标签
                        // urlFilter: (attrName, value, absolutePath) => {
                        //     // attrName => "src"
                        //     // value => "/p/_/js/main.js"
                        //     // absolutePath  => "F:\……\src\module3\index.html"
                        //     if (attrName === "src" && value.startsWith("/")) {
                        //         return false;
                        //     }
                        //     return true;
                        // },
                        list: [
                            "...",
                            {
                                tag: "script",
                                attribute: "src",
                                type: "src",
                                filter: (tagName, attrName, kvs, absolutePath) => {
                                    // tagName => "script"
                                    // attrName => "src"
                                    // kvs => [{"name":"src","value":"/p/_/js/main.js"}]
                                    // absolutePath => "F:\……\src\module3\index.html"
                                    let srcKV = null;
                                    if (tagName === "script" &&
                                        attrName === "src" &&
                                        Array.isArray(kvs) &&
                                        (srcKV = kvs.filter(x => x.name === attrName)[0])) {
                                        if (srcKV.value.startsWith("/")) {
                                            return false;
                                        }
                                    }
                                    return true;
                                }
                            },
                        ]
                    }
                }
            }, {
                test: /\.m?js$/,
                exclude: /(node_modules|bower_components)/,
                use: {
                    loader: "babel-loader",
                    options: {
                        /**
                         *   第一种方式
                         *      如果独立使用,你可以使用下面的命令(其他的项目,单独转码使用)
                         *          yarn add @babel/core @babel/preset-env babel-loader core-js html-loader html-webpack-plugin regenerator-runtime webpack webpack-cli -D
                         */
                        presets: [
                            ["@babel/preset-env", {
                                modules: false,
                                useBuiltIns: "usage",
                                corejs: {
                                    version: 3,
                                    proposals: true,
                                },
                                targets: {
                                    ie: 8
                                }
                            }]
                        ],
                        /**
                         *   第二种方式
                         *      如果独立使用,你可以使用下面的命令(其他的项目,单独转码使用)
                         *          yarn add @babel/core @babel/plugin-transform-runtime @babel/preset-env @babel/runtime @babel/runtime-corejs3 babel-loader html-loader html-webpack-plugin webpack webpack-cli -D
                         */
                        // presets: [
                        //     ["@babel/preset-env"]
                        // ],
                        // plugins: [
                        //     ['@babel/plugin-transform-runtime', {
                        //         corejs: {
                        //             version: 3,
                        //             proposals: true
                        //         },
                        //         useESModules: true
                        //     }]
                        // ]
                    }
                }
            }
        ]
    },
};
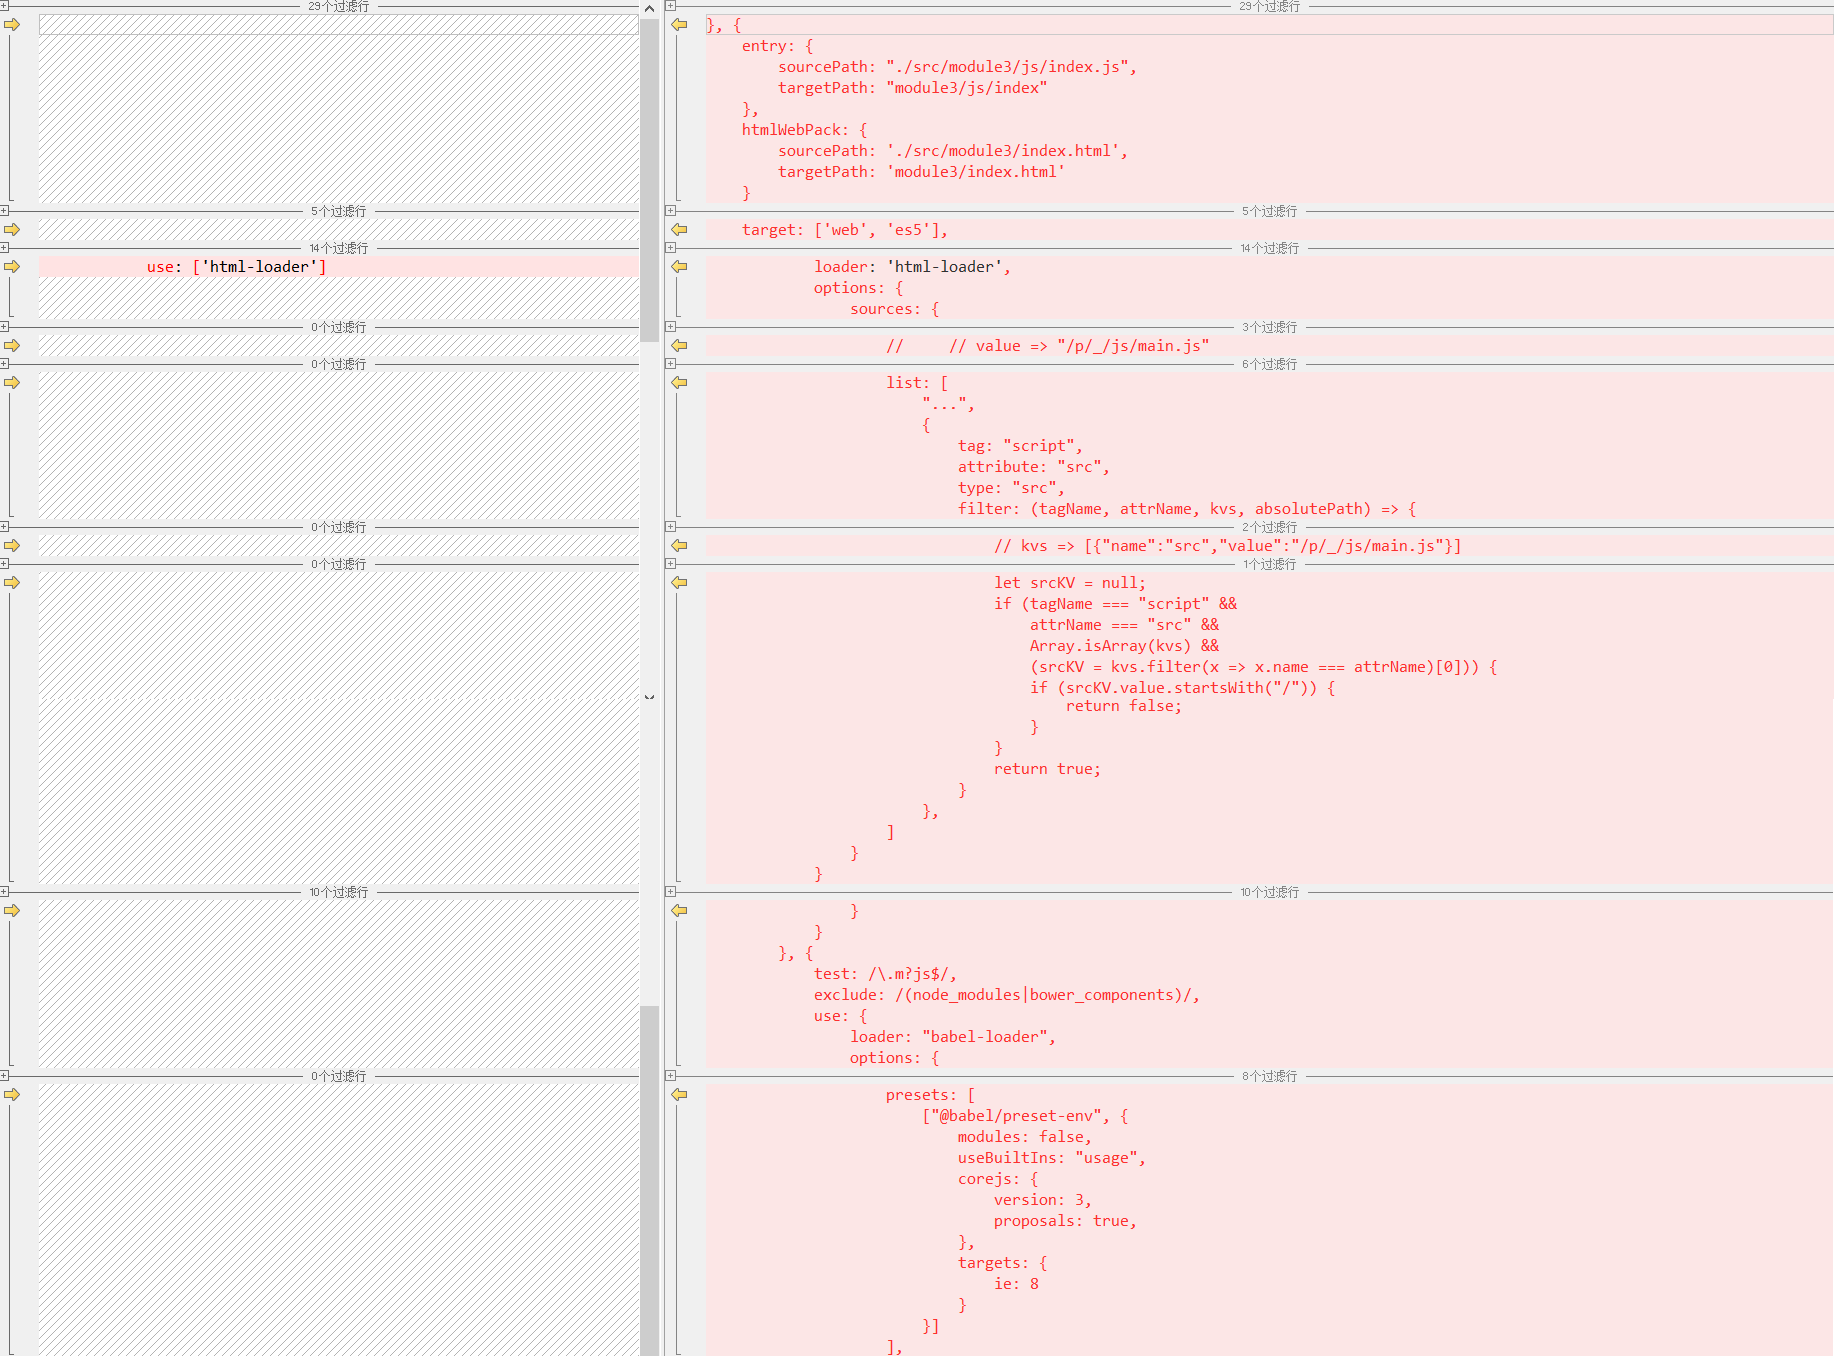
html-loader:这里做了一些配置,目的是排除一些js(站点根目录开始的)
图片中的代码对比:一些注释代码给忽略了,看详细的你可以下载代码。
最后再来看一下转ES5前后的截图对比
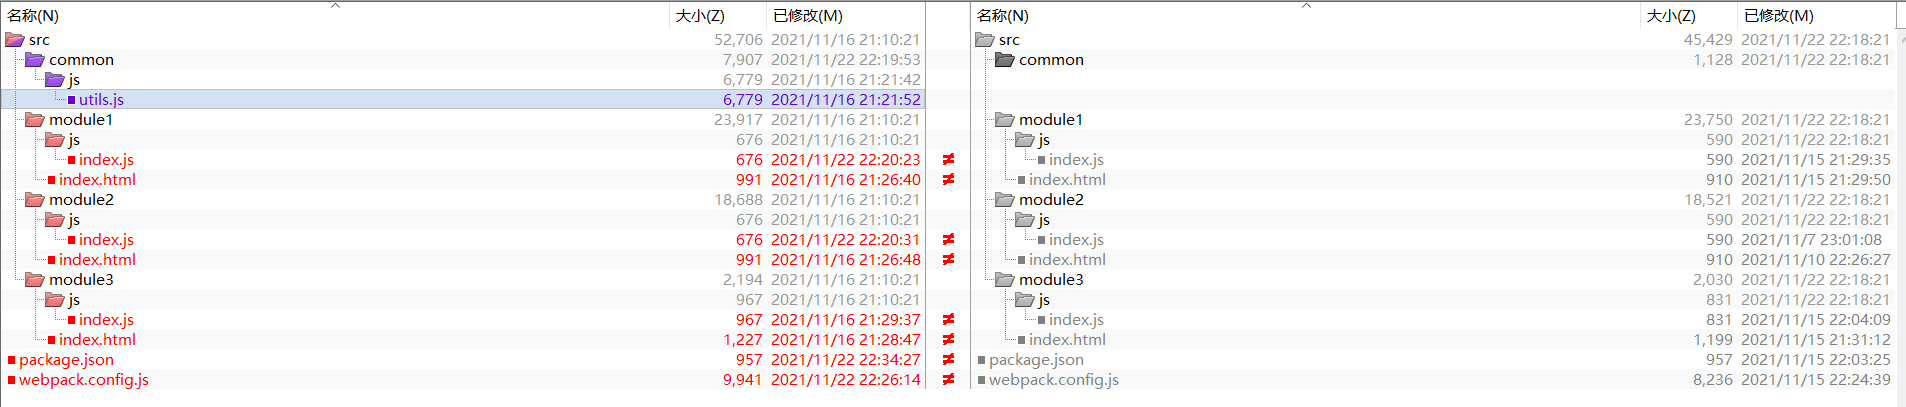
抽取公共JS代码下载
默认打包时将依赖和业务代码都弄到一个JS中了,看着不舒服,希望打包之后的代码也有一个清晰的结构,仅仅是为了看着舒服……看一下目录变化
新增公共方法类库
新增公共方法类库(路径为:/src/common/js/utils.js)
/*! utils.js  业务无关通用方法 */
/**
    * 获取一个GUID
    * 例子:getGUID();=>'AEFC9ABC-1396-494B-AB96-C35CA3C9F92F'
    * @returns {string} 返回一个GUID
    */
export const getGUID = function () {
    return 'xxxxxxxx-xxxx-4xxx-yxxx-xxxxxxxxxxxx'.replace(/[xy]/g, (c) => {
        let r = Math.random() * 16 | 0,
            v = c == 'x' ? r : (r & 0x3 | 0x8);
        return v.toString(16).toUpperCase();
    });
}
两个vue html页面更新
一个GUID:{{guid1}}
两个vue html页面对应js更新
//  第六版新增
import * as utils from '../../common/js/utils';
//  这里放在vue的data中
guid1: utils.getGUID()
另一个非vue html页面更新
两个vue html页面对应js更新
//  第六版新增
import * as utils from '../../common/js/utils';
//  下面的代码放到DOMContentLoaded监听回调中
document.getElementById("guid1").innerHTML = "一个GUID:" + utils.getGUID();
package.json更新
这次并没有添加新的依赖,上图中的变化是版本的升级。
webpack.config.js更新
webpack.config.js添加下面的配置型
{
    optimization: { // 优化项
        splitChunks: { //分割代码块
            cacheGroups: { // 缓存
                'my': { // 自己整理的通用方法
                    priority: 100,
                    name: "common/js/common", // 以'/'分割,最后一项是文件的名称,前面的都是目录
                    test: /[\\/]src[\\/](common)[\\/]/,
                    chunks: 'initial',
                    minSize: 0,
                    minChunks: 1,
                    filename: '[name].js'
                },
                'core-js': { // 抽取第三方模块:core-js
                    priority: 10,
                    name: 'core-js',
                    test: /[\\/]node_modules[\\/](core-js)[\\/]/,
                    chunks: 'initial',
                    minSize: 0,
                    minChunks: 1,
                    filename: 'lib/[name]/[name].js'
                },
                'vue': { // 抽取第三方模块:vue
                    priority: 9,
                    name: 'vue',
                    test: /[\\/]node_modules[\\/](@vue|vue|vue-loader)[\\/]/,
                    chunks: 'initial',
                    minSize: 0,
                    minChunks: 1,
                    filename: 'lib/[name]/[name].js'
                },
                'other': { // 公共的代码
                    priority: 8,
                    name: "other",
                    chunks: 'initial',
                    minSize: 0,
                    minChunks: 2, // 这个代码引用多少次才需要抽离
                    filename: 'lib/[name]/[name].js'
                }
            }
        }
    }
}
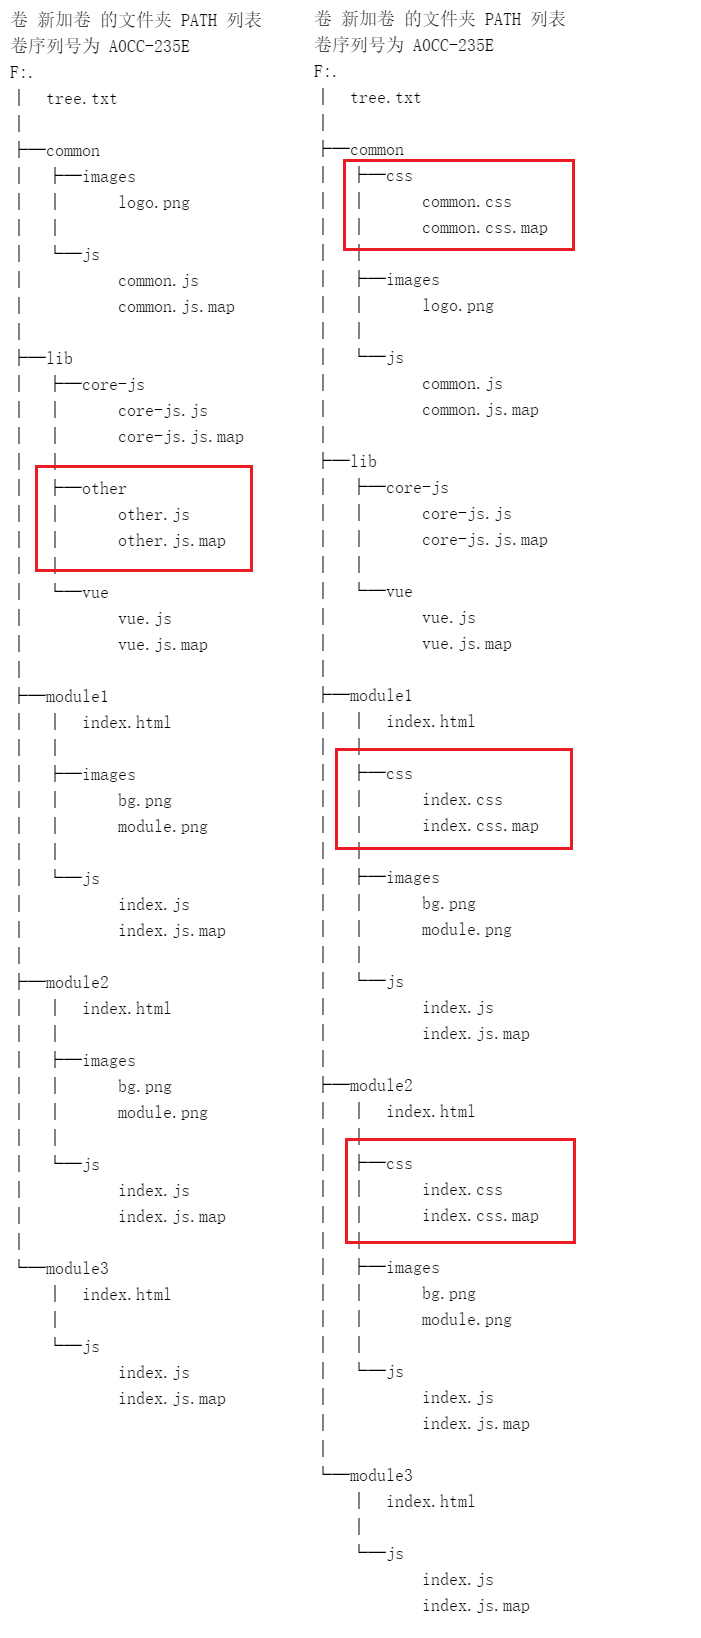
提取CSS到单独的文件中代码下载
前面的示例中用到的css都弄到了JS中,感觉不是很爽,希望webpack源码项目和打包之后的目录尽量保持一致,这也是这片文档的宗旨……
这次提取CSS,代码目录没有改变……
package.json更新
新增
# 你可以用下面的命令安装。上一版本没有添加新的依赖,这里使用ES6转ES5的方式1,在这基础上添加 mini-css-extract-plugin
yarn add vue@next
yarn add @babel/core @babel/preset-env @vue/compiler-sfc babel-loader core-js css-loader html-loader html-webpack-plugin less less-loader mini-css-extract-plugin regenerator-runtime style-loader vue-loader@next webpack webpack-cli -D
webpack.config.js更新
引入
// 第七版:添加的内容
const MiniCssExtractPlugin = require("mini-css-extract-plugin");

let tempModuleExportsObj = {
    module: {
        rules: [
            // 第七版:更新
            {
                test: /\.less$/,
                use: [MiniCssExtractPlugin.loader, 'css-loader', 'less-loader']
            }
        ]
    },
    plugins: [
        // 第七版:添加的内容
        new MiniCssExtractPlugin({
            filename: ({
                chunk
            }) => `${chunk.name.replace('/js/', '/css/')}.css`,
        })
    ]
};
最后再看一下,不提取CSS和提取之后的目录对比:
这里还发现了一个问题,html页面对js的引入都添加到了head标签下并且提取css文件都放在script标签的后面,赶紧处理一下吧
查了一下,发现是html-webpack-plugin插件
clean-webpack-plugin 插件和 copy-webpack-plugin 插件
这里在添加两个插件:clean-webpack-plugin 生成之前先删除(你手动添加的文件也会删除);copy-webpack-plugin 拷贝文件到指定的目录。这两个插件本文档使用的比较简单,就不添加代码下载了。
创建一个文件(路径为:/src/mock/test.json),文件随便写点,你随意
package.json更新
#   你可以用下面的命令安装
yarn add clean-webpack-plugin copy-webpack-plugin -D
webpack.config.js更新
// 第八版:添加的内容
const {
    CleanWebpackPlugin
} = require('clean-webpack-plugin');
const CopyWebpackPlugin = require('copy-webpack-plugin');

let tempModuleExportsObj = {
    plugins: [
        // 第八版:添加的内容
        new CleanWebpackPlugin(),
        new CopyWebpackPlugin({
            patterns: [{
                from: 'src/mock',
                to: 'mock'
            }, ]
        })
    ]
};