大语言模型-番外篇
在接触大语言模型的时候,除了他本身,还有许多其他的……
LLM 社区
- Hugging Face
- hf-mirror.com - Huggingface 镜像站
- AI快站 - HuggingFace模型免费加速下载
- 魔搭社区
- 始智AI-wisemodel-中国AI开源创新社区
已经尝试的模型
- 魔搭社区
-
git lfs install # 进入魔搭社区的某个项目之后,相对路径地址可以拷贝 git clone https://modelscope.cn/ZhipuAI/chatglm2-6b.git git clone https://modelscope.cn/ZhipuAI/chatglm3-6b.git git clone https://modelscope.cn/ZhipuAI/codegeex2-6b.git git clone https://modelscope.cn/baichuan-inc/Baichuan2-7B-Chat.git git clone https://modelscope.cn/qwen/Qwen-1_8B-Chat.git git clone https://modelscope.cn/qwen/Qwen-7B-Chat.git git clone https://modelscope.cn/qwen/Qwen-14B-Chat.git git clone https://modelscope.cn/qwen/Qwen-72B-Chat.git git clone https://modelscope.cn/qwen/Qwen-72B-Chat-Int4.git git clone https://modelscope.cn/01ai/Yi-6B-Chat.git git clone https://modelscope.cn/WisdomShell/CodeShell-7B-Chat.git git clone https://modelscope.cn/deepseek-ai/deepseek-coder-1.3b-instruct.git git clone https://modelscope.cn/deepseek-ai/deepseek-coder-6.7b-instruct.git - Huggingface 镜像站
-
魔搭社区没有的只能依靠他了
- defog/sqlcoder-7b
- moka-ai/m3e-base
- 官网下载
-
还有可以在官网下载的
NVIDIA
科普
Driver Version for CUDA
要想安装
-
打开 NVIDIA 控制面板。
- 右键单击Windows桌面,从上下文菜单中选择“NVIDIA控制面板”。
- 你也可以通过在任务栏上找到 NVIDIA 图标,右键单击它,然后选择“NVIDIA 控制面板”来打开。
-
在 NVIDIA 控制面板中,点击“帮助”菜单,然后选择“系统信息”。
- 说明:在 NVIDIA 控制面板左下角也有“系统信息”的链接
-
在“系统信息”窗口中,你将看到“驱动程序版本”信息,其中包括你当前安装的 NVIDIA 驱动程序的版本号。
- 在“系统信息”窗口中,有“显示”和“组件”两个页签。默认选中“显示”,上面的信息也是“显示”页签下
- 重点:网上搜索时,一般说的都是在“组件”页签下“NVCUDA64.dll”的产品名称“NVIDIA CUDA 12.2.138 Driver”。对,就是其中的那串数字。

嗯,有了这个之后我们就可以去下载
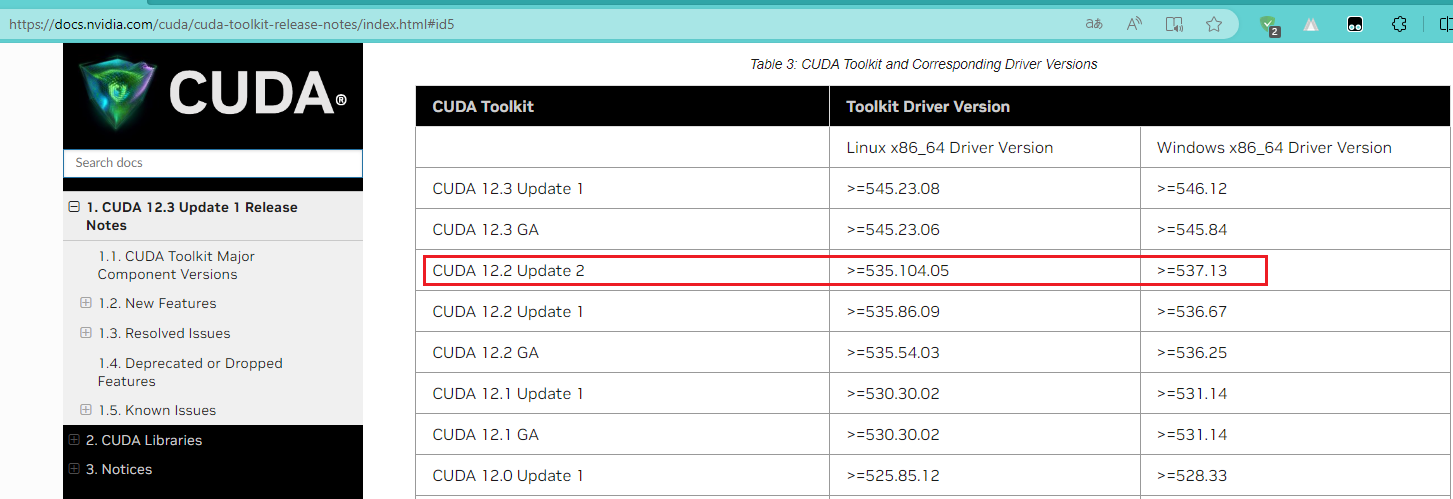
😵😵😵,感觉这里是按照 Driver Version 对应 CUDA 版本的,并且还有兼容模式……暂时按照不兼容的选吧。如下:Table 3:CUDA Toolkit and Corresponding Driver Versions
CUDA Toolkit
官网:CUDA Toolkit - Free Tools and Training | NVIDIA Developer、CUDA Toolkit Archive | NVIDIA Developer
cuDNN
官网:CUDA Deep Neural Network (cuDNN) | NVIDIA Developer
Python系列
Python
对于
包管理器
pip
官网:pip · PyPI
别人安装速度怎么样?咱不知道。反正我这里的速度那是龟速啊!咱们国人也真够苦逼的,弄各种各种的镜像……
你可以参照这篇: pypi | 镜像站使用帮助 | 清华大学开源软件镜像站 | Tsinghua Open Source Mirror,看看如何设置国内镜像源。
#   安装依赖(使用最初设置的镜像源或者使用已经修改的全局镜像源)
pip install -r requirements.txt
#   仅本次安装时使用指定镜像源
pip install -r requirements.txt -i https://pypi.tuna.tsinghua.edu.cn/simple
conda
官网:GitHub - conda/conda 、Conda — conda documentation
Conda 是一个开源的包管理系统和环境 在 Windows、macOS 和 Linux 上运行的管理系统。注:翻译的。你也可以看看维基百科是如果解释的:Conda - 维基百科,自由的百科全书
工具软件: :: Anaconda.org、Miniconda — miniconda documentation
设置镜像: Anaconda | Miniconda 镜像使用帮助
你可以看看这篇文章:深度解析:Anaconda与Miniconda之间的选择 - 知乎
pipenv
Poetry
PDM
虚拟环境管理工具
venv
这个使用起来比较方便,如果你现在安装Python,venv已经默认安装了。
#   创建虚拟环境
python -m venv venv
#   激活虚拟环境
.\venv\scripts\activate
#   退出虚拟环境
deactivate
#   安装依赖(添加到这里,使用的时候方便一些)
pip install -r requirements.txt

#   你可以创建多个虚拟环境
python -m venv venv1
.\venv1\scripts\activate

python -m venv venv2
.\venv2\scripts\activate
conda
pipenv
Poetry
virtualenv
pyenv
包
PyTorch
官网介绍:PyTorch is an optimized tensor library for deep learning using GPUs and CPUs.
安装最新版本:Start Locally | PyTorch
安装以前版本:Previous PyTorch Versions | PyTorch
安装
#   Windows 下安装 GPU 版本的 torch(说明:因为设置镜像的原因,参照上面的官网安装还是很慢甚至超时)
pip install torch==2.2.1+cu121 torchvision==0.17.1+cu121 torchaudio==2.2.1+cu121 -f https://download.pytorch.org/whl/torch_stable.html

#   Windows 下安装 CPU 版本的 torch
pip install torch torchvision torchaudio

#   Linux 下安装 GPU 版本的 torch
pip3 install torch torchvision torchaudio

#   Linux 下安装 CPU 版本的 torch
pip3 install torch torchvision torchaudio --index-url https://download.pytorch.org/whl/cpu
检测 torch
#   你可以这样
python -c "import torch; print('CUDA 是否可用:',torch.cuda.is_available()); print('PyTorch 版本:',torch.__version__)"

#	命令行输入 python 进入 python 交互模式
python

#	引入 torch
import torch

#	查看 PyTorch 版本、cuda 是否可用等
#		注意:torch.cuda.get_device_capability() 可以传递参数,例如:0 或者 1
print('PyTorch 版本:',torch.__version__)
print('显卡数量:',torch.cuda.device_count())
print('CUDA 是否可用:',torch.cuda.is_available())
print('CUDA 版本:',torch.version.cuda)
print('CUDA 算力(大,小):',torch.cuda.get_device_capability())
print('是否支持 bf16:',torch.cuda.is_bf16_supported())
print('cuDNN 版本:',torch.backends.cudnn.version())

print(f"PyTorch 版本:{str(torch.__version__)} \n显卡数量:{str(torch.cuda.device_count())} \nCUDA 是否可用:{str(torch.cuda.is_available())} \nCUDA 版本:{torch.version.cuda} \nCUDA 算力(大,小):{torch.cuda.get_device_capability()} \n是否支持 bf16:{torch.cuda.is_bf16_supported()} \ncuDNN 版本:{torch.backends.cudnn.version()}")

#	退出交互模式
exit()
Transformers
Mamba
官网:GitHub - state-spaces/mamba
Rust系列
- Rust Programming Language
-
- WasmEdge
- WasmEdge
- 安装和卸载 WasmEdge | WasmEdge Developer Guides(WASI-NN 插件)